Hello HonestReviewCenter users we are back with the solution with regard to the new Uneekor EYE XO2 launch monitor’s installation guidance. Here we will teach you what are the minimum ideal space requirements, tech bundle required for Uneekor EYE XO2 installation,
All pro golfers already know about the new EYE XO2 launch monitor features. If you still want to know the details you can check here: Uneekor EYE XO2 Review.
Uneekor EYE XO2 Installation Guide

First of all before reaching to the space and tech bundle requirements we should know what components are included in Uneekor EYE Xo2 package.
What Components Comes Up With Uneekor EYE XO2?
- Uneekor EYE XO2 Launch Monitor
- Mounting Bracket
- Email – Software Installer
- Power Cable 11 Feet
- Connector
- Power Adapter
- USB Ethernet Adapter
- 60 Feet LAN Cable
- 10 × M4 32mm Screws
- 10 × M6 15mm Screws
- 4 × M6 15mm Screws
- 4 × Lower M6 15mm Screws
- The View Software
- Calibration Charts
Hardware Required For Installation:
1) Phillips screwdriver
2) M4 32mm Screw × 9
3) Ladder
4) Bracket
5) Sensor Bar
Uneekor EYE XO2 Space Requirements:
| Recommended Space | 12’W × 9’H × 14’D |
| Minimum Space | 10’W × 9’H × 14’D |
We suggest you to follow the recommended space requirements it will help you play your game smoothly.
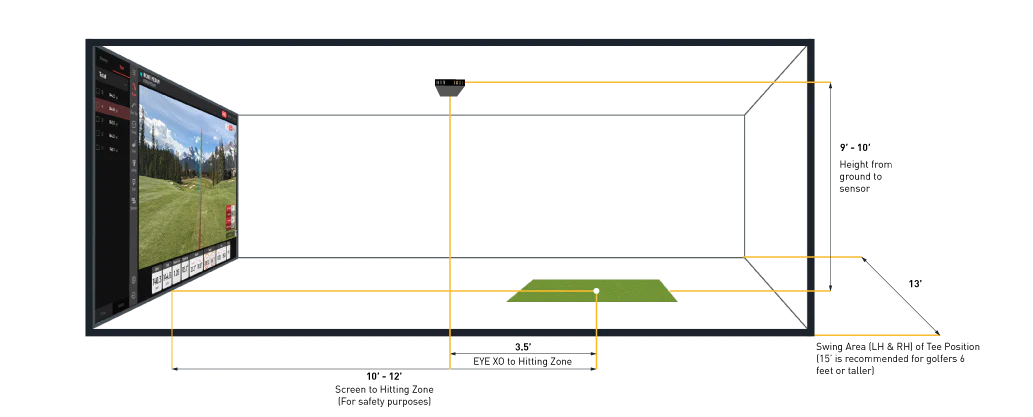
Depth: You will need 7-8′ space between your screen and projector and the total putting area should be 9-10′ from your screen.
Your EYE XO monitor will be installed on the ceiling 3.5′ in front of your hitting zone. For backswing you will need extra 5′ area.
Height: The EYE XO2 monitor should be installed 9-10′ above the hitting area. We recommend 10′ for better accuracy.
If your ceiling height is above 10 feet then use wall mount and adjust the distance to 9′-10′.
Width: We recommend 13′ minimum width area for comfort playing and if your height is 6 feet or more then go for 15′ width room area.
If you are still not getting exact idea of the space requirements then watch the below image for more understanding.

EYE XO2 Technical Bundle Requirements
| CPU | Intel i5 8th Gen or Higher |
| GPU | Nvidia GeForce GTX 1060, AMD Ryzen 3600X,
AMD Ryzen 3rd Gen or Higher Version |
| RAM | 8 GB Minimum |
| OS (Operating System) | Windows 10 64 Bit (Mac iOS not Supported) |
| Ethernet Port Required | YES |
| Resolution | 1920 × 1080 |
How To Get Ready Uneekor EYE XO2 Within Minutes?
The beauty of the EYE XO2 as a launch monitor lies in its incredible portability and rapid setup anywhere on the course thanks to its onboard intelligence. By following this streamlined sequence, you have launch metrics recording within minutes:
- Mark landing zone safely down fairway and launch area for ideal camera view and lighting angles.
- Unpack drone, connect controller and perform IMU calibration on landing pad per app guidance.
- Initiate Auto Takeoff Mode to quickly ascend and position in an overhead capture view down fairway while manual mode fine tunes distance.
- Align golfer, launch zone and target landing area all clearly in camera frame and lock position.
- Signal golfer sequence ready triggering EYE to descent to tee box capture height when swing initiates.
- On club impact, EYE rises rapidly to trace ball view until landing while automatically collecting and processing metrics for display.
Download Uneekor EYE XO Installation Manual: Official Uneekor Page
Also Read Our Uneekor EYE XO Simulator Review
Before installing the Uneekor Eye XO2 Golf Launch Monitor, make sure you have a suitable space with the minimum required dimensions. The recommended space should have enough height, width, and depth to support the launch monitor while also allowing the golfer to swing comfortably. Additionally, ensure that your computer or device satisfies the system requirements listed in the product manual.
Begin by securely attaching the Uneekor Eye XO2 gadget in its intended position and ensuring perfect alignment. Connect all relevant cables, including power, USB, and HDMI if applicable. Ensure that all connections are secure. Refer to the installation guide for specific information on cable connections and mounting instructions. Calibration of the launch monitor may be required, and the handbook will include step-by-step instructions for this process.
The recommended mounting height is usually indicated in the installation instructions. Mounting the launch monitor at the proper height allows for precise data acquisition and analysis of your golf shots. Follow the manual’s instructions to place the gadget at the best height for your swing.
The Uneekor Eye XO2 Golf Launch Monitor normally comes with its own software. Check the product’s packaging or manual for information on where to obtain the software. Once downloaded, follow the installation instructions in the handbook. During the installation, you may be prompted to change settings and preferences. To achieve optimal performance, ensure that your machine satisfies the software’s system requirements.
Yes, the Uneekor Eye XO2 Golf Launch Monitor is compatible with a variety of third-party simulation applications. A list of supported simulation software can be found in the product manual or on the manufacturer’s website. Install the compatible software on your computer, then follow the integration instructions provided by Uneekor and the simulation program.
If you have any problems during or after installation, turn to the troubleshooting section of the handbook. Common concerns may include connectivity issues, incorrect shot data, or software failures. Check cable connections, confirm appropriate calibration, and refer to the troubleshooting guide for step-by-step instructions. If the problems persist, contact Uneekor’s customer service for help.
Calibration is necessary for accurate shot data. Follow the calibration directions in the installation handbook closely. This usually entails hitting a few shots with specific clubs to help the launch monitor learn and analyze your swing. Make sure the striking area is well-lit and clear of obstacles. If you alter your configuration or move the launch monitor, repeat the calibration process.
The Uneekor Eye XO2 Golf Launch Monitor is primarily intended for indoor use. Outdoor variables, such as sunlight and weather, can affect the device’s accuracy. It is advised that you install and utilize the launch monitor in a controlled indoor environment.
Adequate lighting is required for the launch monitor to correctly capture your shots. Make sure the installation area is well-lit, and avoid direct glare on the launch monitor’s sensors. If necessary, add additional lights to improve visibility.
According to the product handbook, the Uneekor Eye XO2 can be utilized with either a dedicated computer or a shared system. Make sure the PC satisfies the system requirements for maximum performance. Sharing the launch monitor with many users may necessitate individual user profiles for precise shot analysis.
The recommended distance is often specified in the installation guide. Maintaining the required distance between the golfer and the launch monitor guarantees proper shot tracking. Follow the manual’s instructions to properly position yourself within the appropriate hitting area.
While the launch monitor can be moved after installation, frequent relocations are not recommended. If you move the device, you may need to recalibrate it to verify that the shot data is accurate. Specific instructions for recalibration following relocation can be found in the installation handbook.


4 Comments
Pingback: Uneekor EYE XO2 Review Launch Monitor - Get $2000 Discount
Pingback: Uneekor Eye Mini Review: A Game Changer Golf Launch Monitor
Pingback: Uneekor EYE XO Installation Guide - Step By Step Procedure
Pingback: Bushnell Launch Pro Setup: Step By Step Full Process